Quickstart
This guide will cover the basics for getting started using Streamdal.
Before we begin, let’s familiarize ourselves with a couple of terms that are used throughout our platform.
Terminology
Collections
Streamdal hooks directly into your message broker or CDC stream as a polite consumer, and relays all of the event data/streams to our platform. All of the data captured is indexed in a logical grouping called a Collection. Before we can tap into any data, a Collection needs to be created and scoped within the console UI. This is the first step in getting started.
Read more about Collections here.
Plumber
plumber is an open-source Swiss Army Knife CLI tool used for interacting with
messaging and streaming systems like Kafka, RabbitMQ, NATS, SQS, and many
others. It also acts as the Streamdal agent. Whether you are working locally,
on-prem, or in the cloud, you can deploy plumber in a variety of ways to
interact with and connect to your systems.
Read more about Plumber here.
Step 1: Create your First Collection
After registration, you are put directly into the dashboard view. This is where you get a holistic view of all data, monitors, and associated logs.
From here you can:
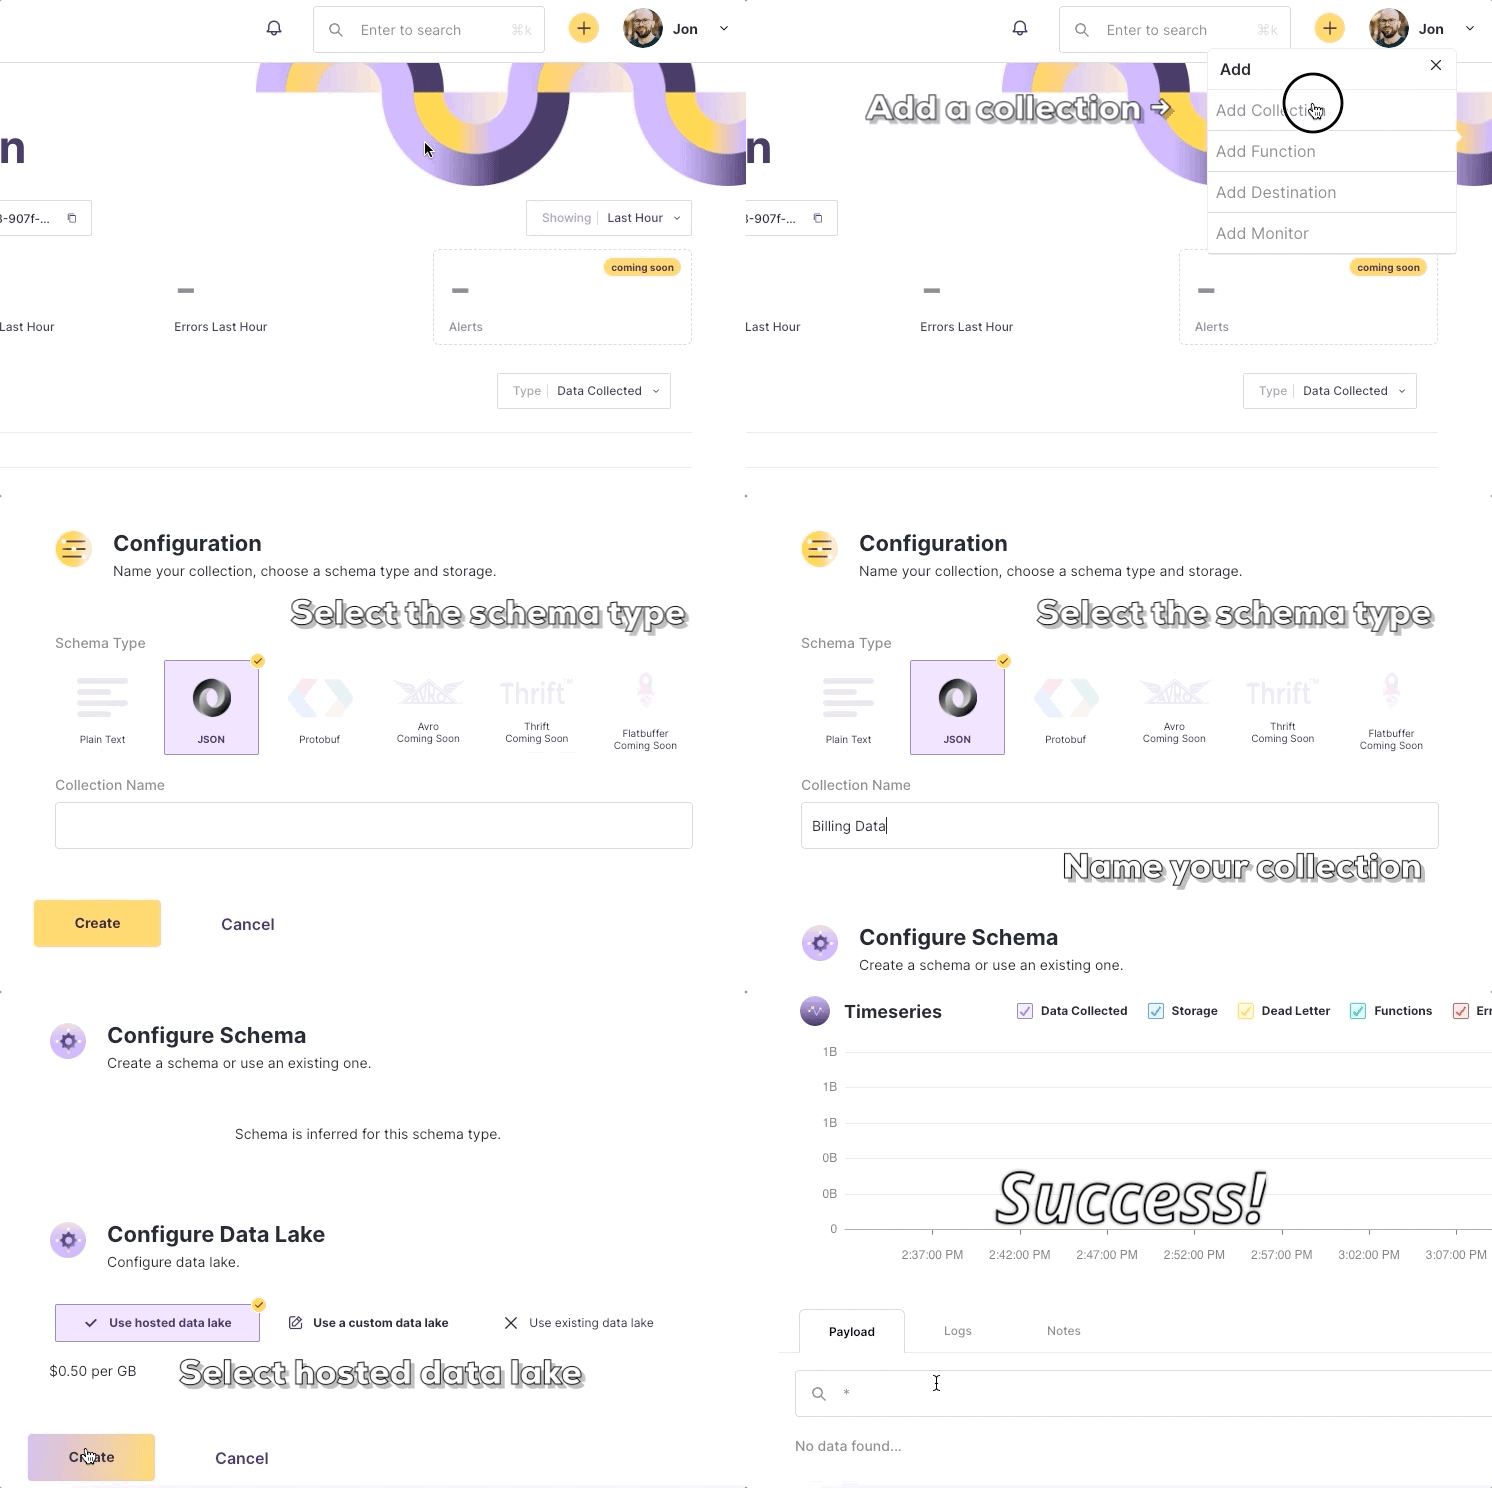
- Select either the plus icon next to your avatar and username and select ‘Add Collection,’ or you can click on the Collections button in the left nav pane to create new collections
- Select schema type
- Enter a name for the collection
- Upload schemas (note that plaintext and JSON are inferred, so no upload is required!)
- Configure data lake to use hosted data lake (default)
- Click create!

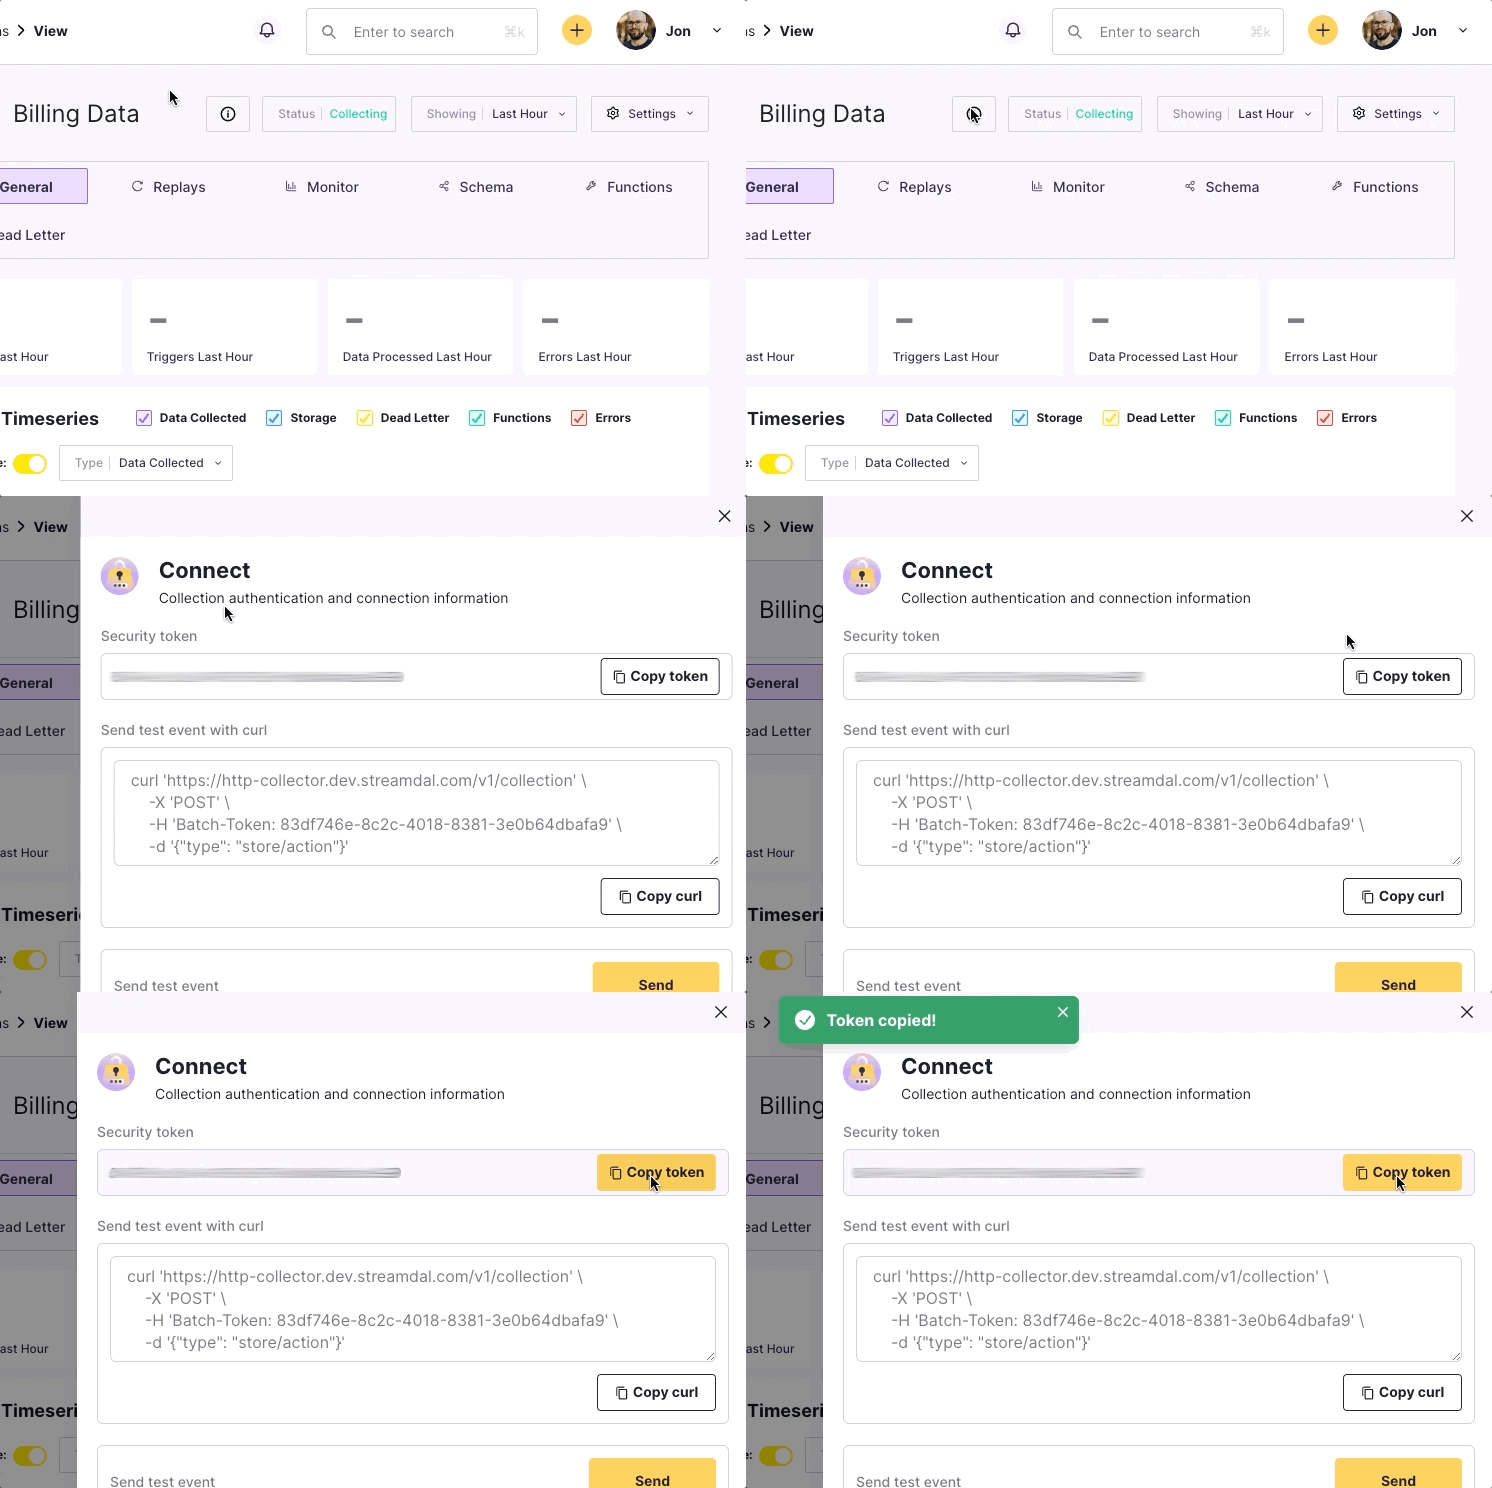
With every collection created, there is a unique assigned collection token. This will be passed to Plumber in order for it to send data to the correct Collection.
Step 2: Install and Configure Plumber
Click here for detailed instructions for installing Plumber. Once installed, you will need to connect Plumber to your broker/messaging system, and create a relay between Plumber and Streamdal with your collection token.
For this step in the guide, we will be demonstrating on a local RabbitMQ. Check out the different environment variables here for what flags to pass for different systems like Kafka, Kineses, SQS, etc.
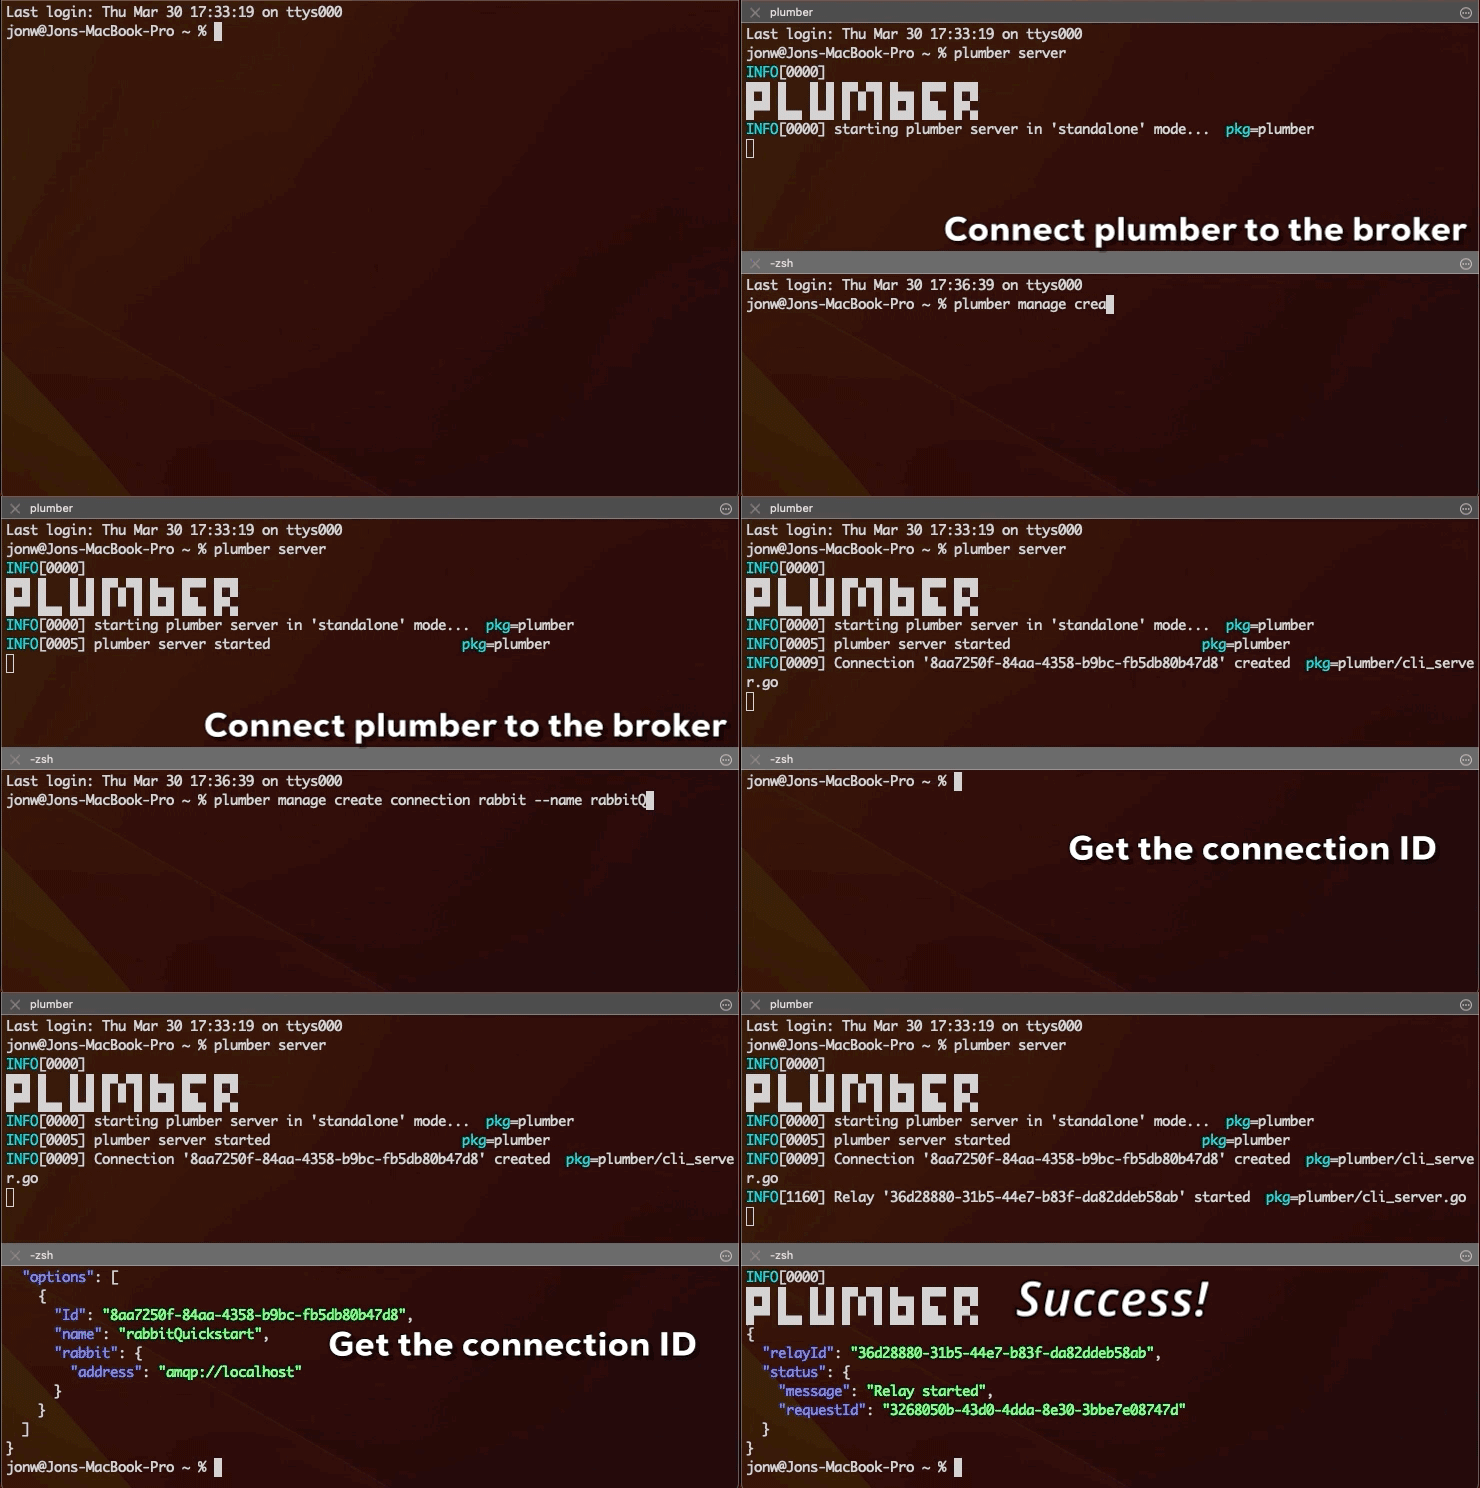
Use the following CLI commands to get plumber relaying data to Streamdal.
- Start Plumber in server mode
plumber server- In a new terminal window, create the connection between Plumber and the broker
plumber manage create connection rabbit --name rabbitQuickstart- Create a relay between Plumber and Streamdal. This is how we ingest data
plumber manage create relay rabbit \
--connection-id=$id_for_rabbitQuickstart \
--collection-token=$secret_collection_token --exchange-name=billing \
--binding-key=billing --queue-name=plumber-billing --queue-durable
Instead of manually entering CLI commands or creating scripts, you can containerize plumber in your infrastructure. Below is what the docker-compose.yaml looks like for this guide.
Note: if you are copying this docker-compose.yaml, just be sure to create the exchange and binding key within Rabbit once launched, and link it to the plumber-billing queue.
version: "3.2"
services:
  rabbitmq:
    image: rabbitmq:3-management-alpine
    container_name: 'rabbitmq'
    environment:
      - RABBITMQ_DEFAULT_USER=streamdal
      - RABBITMQ_DEFAULT_PASS=streamdal
    ports:
        - 5672:5672
        - 15672:15672
  plumber:
    image: streamdal/plumber:latest
    platform: linux/amd64
    depends_on:
      - rabbitmq
    command:
      - ./plumber-linux
      - relay
      - rabbit
    environment:
      - PLUMBER_RELAY_TYPE=rabbit
      - PLUMBER_RELAY_TOKEN=$(MyToken)
      - PLUMBER_RELAY_RABBIT_EXCHANGE=billing
      - PLUMBER_RELAY_RABBIT_QUEUE=plumber-billing
      - PLUMBER_RELAY_RABBIT_ROUTING_KEY=billing
      - PLUMBER_RELAY_RABBIT_QUEUE_EXCLUSIVE=false
      - PLUMBER_RELAY_RABBIT_QUEUE_DURABLE=true
      - PLUMBER_RELAY_RABBIT_ADDRESS=amqp://streamdal:streamdal@localhost:5672
      - PLUMBER_RELAY_GRPC_ADDRESS=grpc-collector.batch.sh:9000
    restart: on-failure
If you ever need to find Plumber connection IDs, you can use: plumber get connection

You can find the collection token in the console UI of the collection you created:

Ensure that the environment variable PLUMBER_RELAY_TOKEN is set to the unique
collection token. This is similar to the --collection-token flag you can pass
manually, and is needed to point Plumber to the unique collection.
Start Observing Data
And that’s it! You can start watching events appear in the console.
If you’ve installed Plumber, then you also have a powerful tool for interacting with your messaging system. Click here to learn how to write data to your broker with Plumber.
Now you are ready to take advantage of more advanced functionality:
- Search
- Replays
- Monitors & Alerts
- Smart Deadletter Queue (DLQ)
- Schema Management
- Functions & Transformations
Not sure what to feature to try next? Be sure to review the various use cases for a better idea of the kinds of performance, observability, and reliability you can enjoy with Streamdal.